React Basics
- What is React
- React Core Concepts
- React Routing
- React Hooks
- React Reducer
- Global Variables
- React Parent and Child Component
- Preserving and Resetting State
- memo, useMemo, useCallback
What is React
What is React?
React is a JavaScript library for building interactive user interfaces (UIs). Which can be clicked on-screen by the users.
In terms of library, React provide helpful APIs to build the UI! It is up to the developer on how to use those APIs to build what they want to build to present to the user.
However, using React by itself, requires some configuration that the developer would have to do, web frameworks such as Next.js configures React for you right out of the box, and provide additional structure, features, and optimization for your application.
Rendering User Interface
Having some solid understanding of how browser interprets the user interface is fundamental to understanding how React works.
When a user visits a web page, the server returns a HTML page back to the client (Browser in this case) which may look something like
<html>
    <body>
        <p>Hello world!</p>
    </body>
</html>
The browser then reads the HTML and creates the Document Object Model (DOM).
What is DOM?
The DOM (Document Object Model) is an object representation of the HTML elements. It acts as the bridge between your code and the user interface and has a tree like structure with parent and child relationships.
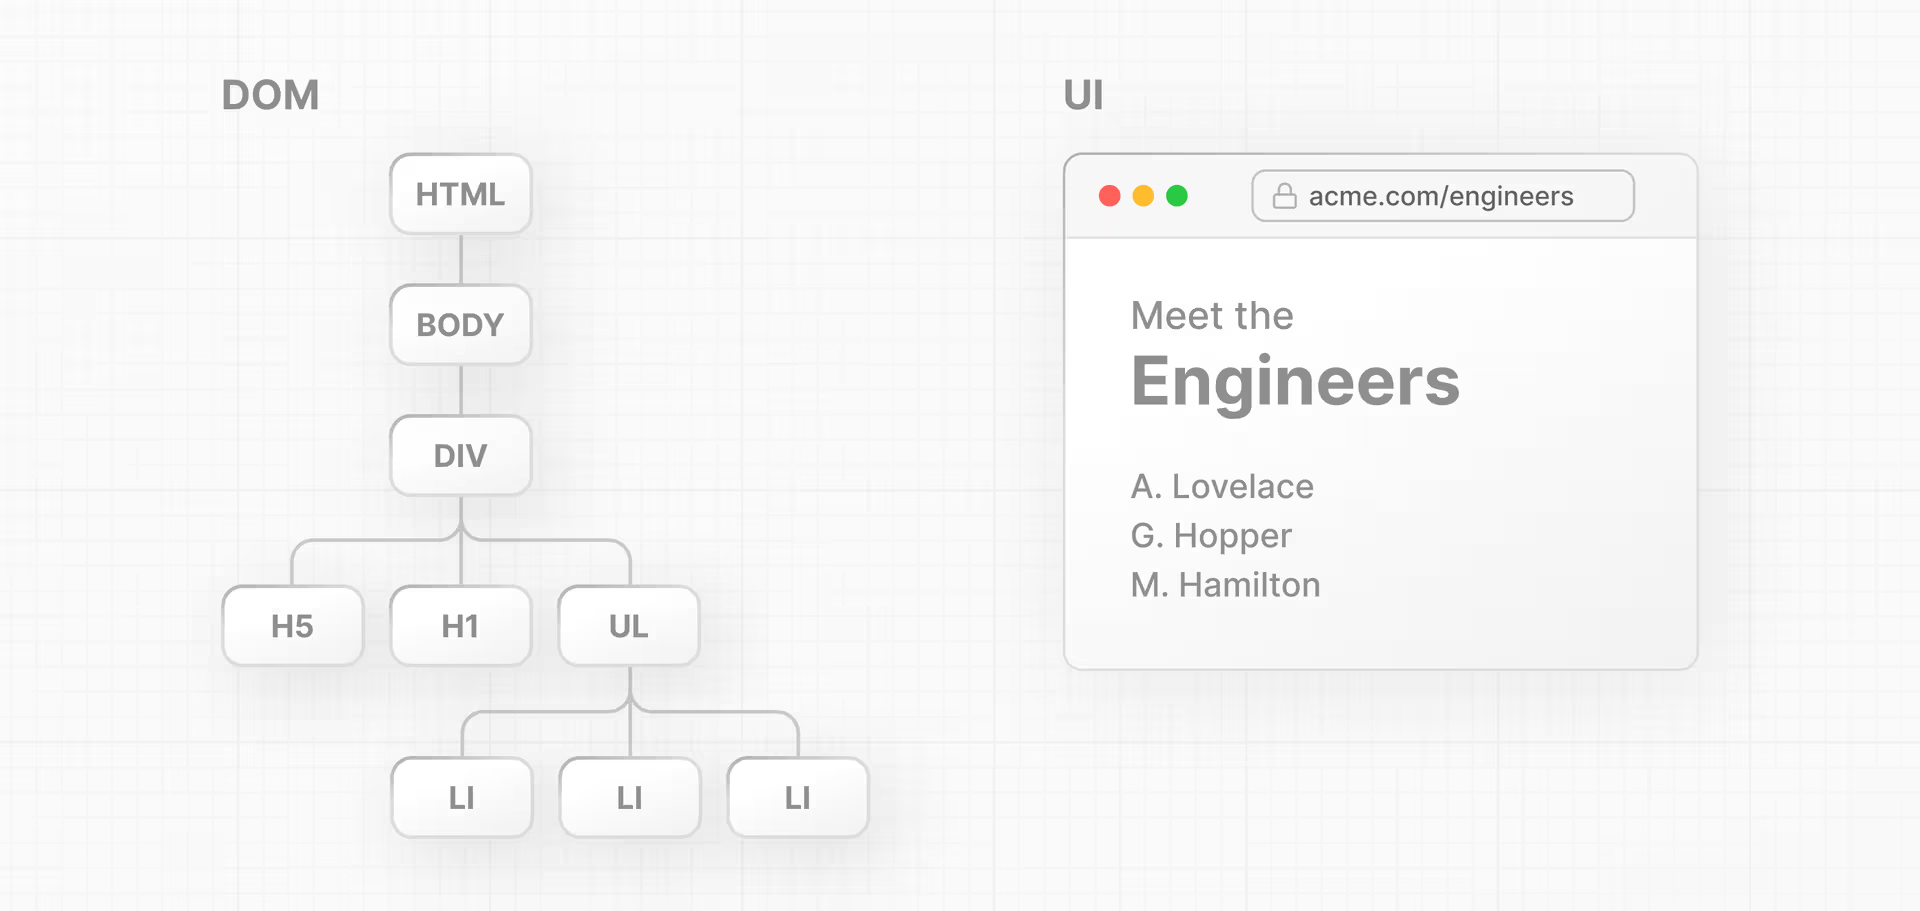
You can manipulate the DOM by using JavaScript APIs, in which then the browser will render the result back to the user.
Using Plain JavaScript vs React
If you use plain JavaScript to say create a page that will insert a header text it will look something like below:
<html>
    <body>
        <div id="app"></div>
        <script type="text/javascript">
            const app = document.getElementById("app");

            const header = document.createElement("h1");

            const text = "This is a sample text hello world!";
            const headerContent = document.createTextNode(text);

            header.appendChild(headerContent);

            app.appendChild(header);
        </script>
    </body>
</html>
However, as you can see this is pretty verbose just to append a header element into the DOM. With React it simplifies a lot of the flow.
Now without having to install node or do any compiler configuring, you can start using React by just importing the main library scripts from CDNs:
<script src="https://unpkg.com/react@18/umd/react.development.js"></script>
<script src="https://unpkg.com/react-dom@18/umd/react-dom.development.js"></script>- react: This is the core library
- react-dom: This provides DOM-specific methods that let you use React with DOM
Now we can try to translate the verbose pure JavaScript code that we wrote to using React.
<html>
    <body>
        <div id="app"></div>
        <script src="https://unpkg.com/react@18/umd/react.development.js"></script>
        <script src="https://unpkg.com/react-dom@18/umd/react-dom.development.js"></script>
        <script type="text/javascript">
            const app = document.getElementById("app");
            const root = ReactDOM.createRoot(app);
            root.render(<h1>Hello world!</h1>);
        </script>
    </body>
</html>
Does It Work?
Now if you open the file in the browser, there will be nothing rendered and if you inspect the console output it will look something like:
Uncaught SyntaxError: expected expression, got '<'This is because we are writing JSX, but the browser doesn't understanding JSX since it can only understand JavaScript.
What is JSX
JavaScript XML, it allows you to embed HTML into JavaScript without having to explicitly create the element yourself.
You are not required to use JSX in React, but it makes writing React application much easier if you can embed HTML into JavaScript.
It is effectively just a syntactic sugar for:
<MyButton color="blue" shadowSize={2}>
  Click Me
</MyButton>
Is compiled into:
React.createElement(
  MyButton,
  {color: 'blue', shadowSize: 2},
  'Click Me'
)
React.createElement takes in couple arguments (type, [props], [...children])
The type can be either a string which are HTML elements, or it could be a React component both a class or function or a React fragment.
In order to leverage JSX, you will need to add in babel CDN:
<script src="https://unpkg.com/@babel/standalone/babel.min.js"></script>More Examples
If you choose to not use JSX and you want to create a header element and insert it into the page, then you will have to do the following:
const myElement = React.createElement('h1', {}, 'I do not use JSX!');

const root = ReactDOM.createRoot(document.getElementById('root'));
root.render(myElement);
But if you choose to use JSX, then you can write HTML code, it gets compiled into JavaScript, and is much easier since you're embedding the exact content in the source code.
const myElement = <h1>I Love JSX!</h1>;

const root = ReactDOM.createRoot(document.getElementById('root'));
root.render(myElement);
To see transpilation in real time you can visit this link: Babel
Closing Note
Now after you have all of those CDN added in you should be able to the page render with the same message! How awesome is that!
React Core Concepts
Core Concepts
You will need to be familiar with three core concepts with React in order to build React applications.
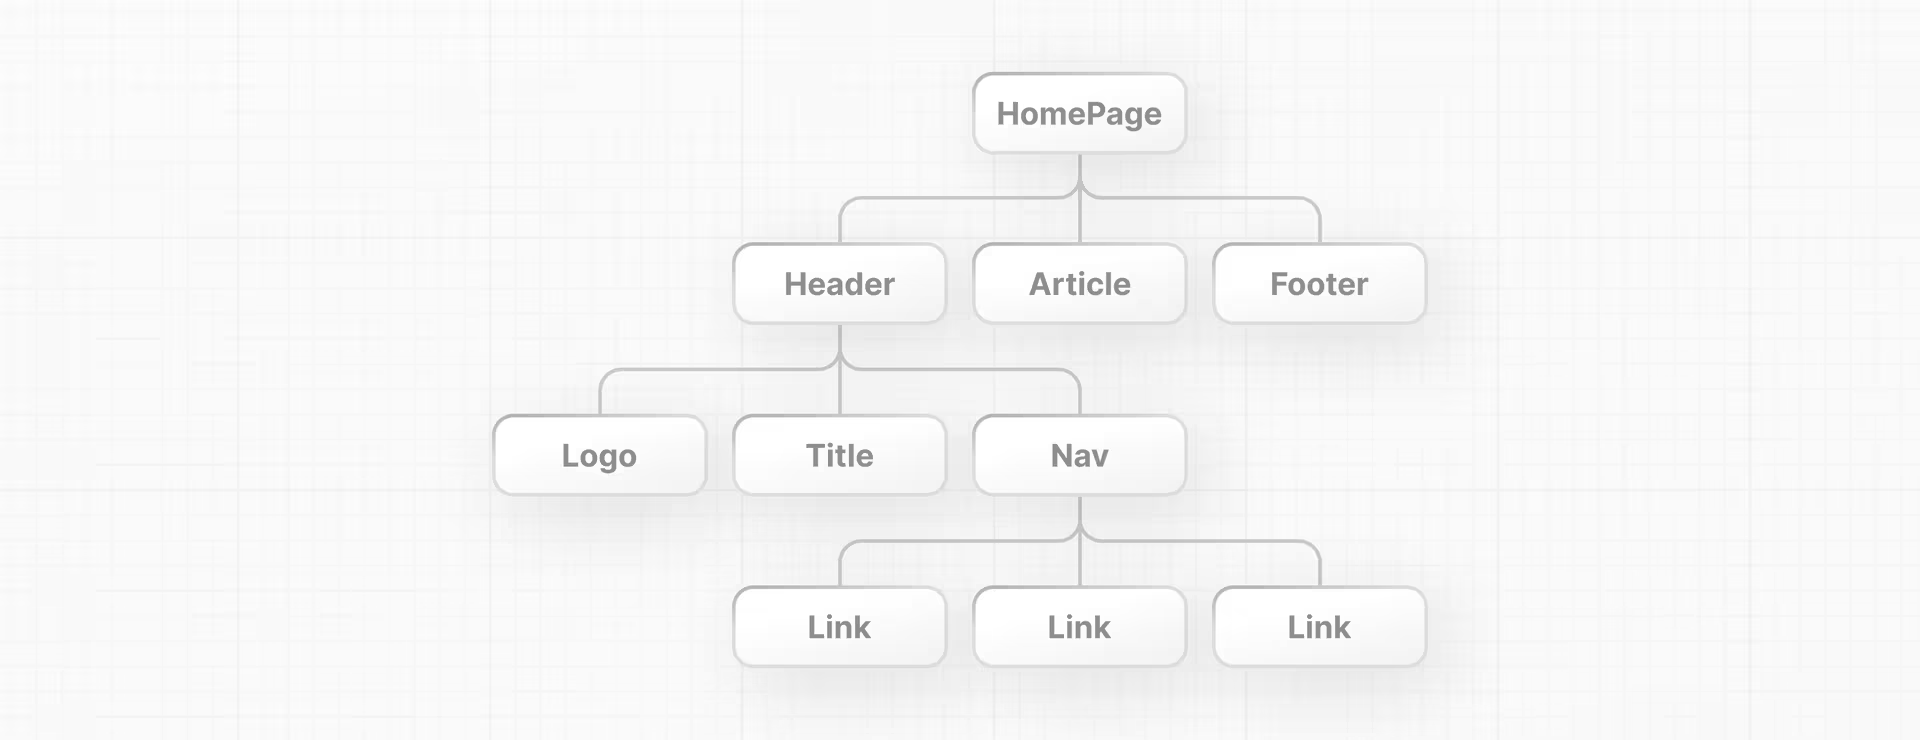
Components
User interface can be broken down into building blocks called components.
Think of it like a self contained, reusable snippet of code. You can compose them with different components that you have write to create a bigger component for your React application!

Having components allows your code to also be maintainable, you can add, update, delete components without touching the rest of the application.
Creating a Component
In React, components are just functions, a function that returns UI elements. So a simplest component would be:
function header() {
  return <h1>Hello World!</h1>;
}
And using it in our CDN provided React application would just be:
<html>
    <body>
        <div id="app"></div>
        <script src="https://unpkg.com/react@18/umd/react.development.js"></script>
        <script src="https://unpkg.com/react-dom@18/umd/react-dom.development.js"></script>
        <script src="https://unpkg.com/@babel/standalone/babel.min.js"></script>
        <script type="text/jsx">

            function header() {
                return <h1>Hello World from a component!</h1>;
            }

            const app = document.getElementById("app");
            const root = ReactDOM.createRoot(app);
            root.render(header);
        </script>
    </body>
</html>
Sadly, this doesn't work because there are couple of nuances
- First, a component name needs to be Capitalized in order to distinguish them from plain HTML and JavaScript. So instead of header it will need to be Header
- Second, when you are using a component you will need to surround them with
<>so that JSX can kick in and compile them intoreact.createElement. If you're interested to learn more about JSX, you can look at this page.
With that being said, if you now make the minor adjustments:
<html>
    <body>
        <div id="app"></div>
        <script src="https://unpkg.com/react@18/umd/react.development.js"></script>
        <script src="https://unpkg.com/react-dom@18/umd/react-dom.development.js"></script>
        <script src="https://unpkg.com/@babel/standalone/babel.min.js"></script>
        <script type="text/jsx">

            function Header() {
                return <h1>Hello World from a component!</h1>;
            }

            const app = document.getElementById("app");
            const root = ReactDOM.createRoot(app);
            root.render(<Header />);
        </script>
    </body>
</html>
This will now work perfectly!
Expanding on Component by Nesting!
You can now create new component by nesting in other components!
Take the following for example, although a bit uncreative, we can create a new component called TwoHeader that have the two Header component nested in. When you render only the TwoHeader component you will be able to see two Header component on the page! Neat right?
One thing to call out is that a component must return HTML elements in a wrapper node. Meaning, there must be one parent node that you're returning. If you want to return say multiple HTML elements for a component, you must wrap them under a div OR use JSX fragments. Fragments
<html>
    <body>
        <div id="app"></div>
        <script src="https://unpkg.com/react@18/umd/react.development.js"></script>
        <script src="https://unpkg.com/react-dom@18/umd/react-dom.development.js"></script>
        <script src="https://unpkg.com/@babel/standalone/babel.min.js"></script>
        <script type="text/jsx">

            function Header() {
                return <h1>Hello World from a component!</h1>;
            }

            function TwoHeader() {
                return <div>
                    <Header />
                    <Header />
                </div>
            }

            const app = document.getElementById("app");
            const root = ReactDOM.createRoot(app);
            root.render(<TwoHeader />);
        </script>
    </body>
</html>
You can continue building more component and creating nested component to build more complicated components.
Passing Props
Now, we have learned how to create a component, we need to add some variety into the mix right? Otherwise, the component would be displaying the same thing everything. We can try changing up the color, the text that it shows on the component.
We can do that with props! Or properties!
In order to pass prop to your component you can just add it as an attribute to where you're using the component, for example, if we are reusing the TwoHeader component we have discussed earlier:
root.render(<TwoHeader text="Wowzers"/>);You can then accept access the argument that's passed by using the parameter props for example. props will be an object with the text key-value pair.
function TwoHeader(props) {
    // { text: "wowzers" }
    return <div>
        <Header text={props.text} />
        <Header text={props.text} />
    </div>
}
You can then access the key-value pair by using the dot notation or if you would also like you can do object deconstruction to take out the text key-value pair.
Additionally you also see the {} symbols used within the JSX expression. It is used to interpolate JavaScript code within the JSX expression, so that you can access the variable otherwise, JSX will just interpret it as a literal string.
You can call functions or do template literals to return a value within the JSX expression!
function TwoHeader({text}) {
    return <div>
        <Header text={text} />
        <Header text={text} />
    </div>
}
States and Event Handlers
You would want to make your web application interactive right? Otherwise, it would be boring to have nothing for the user to interact when you display your web page to your clients.
You can add interactivity through state and event handlers!
For example, say you would like to add a button that when you click will act as a Like button. The following component will print out the text "The user clicked the like button!" in the console whenever you click on the Like button.
export default function Content() {

    function handleClick() {
        console.log("The user clicked the like button!");
    }

    return (
        <div>
            <p>Cute Cat Pictures</p>
            <button onClick={handleClick}>Like</button>
        </div>
    )
}
We can improve this by adding state. States holds data or information about a component that can change over time. When a state of a component changes, the component is re-render the component in order to show that the component has a new state automatically by the React framework. This is fundamental to making your UI design dynamic and reactive to the user's input.
You can create a new state by calling the useState function in your project which returns an array of two object. The first value is the state itself which contains the value that you're storing, while the second value is the setter function that you use in order to update the state.
The reason why that you have to go through the setter to update the state value is because that's how React knows when to re-render the component, by you calling the setter it will know that "Oh the state is changing because the setter function is called". Technically there is nothing stopping you from just updating the state value, but then React wouldn't know that it needs to re-render the component to show that there has been an update to the component.
You can access the value through array destructuring.
let [likes, setLikes] = React.useState(0);Updating the example that we had: Now that we are able to keep track of the amount of likes that has been gathered by the user. If you really like the picture!
export default function Content() {

    let [likes, setLikes] = React.useState(0);

    function handleClick() {
        console.log("The user clicked the like button!");
        setLikes(likes + 1);
    }

    return (
        <div>
            <p>The amount of likes are {likes}</p>
            <button onClick={handleClick}>Like</button>
        </div>
    )
}
States refreshes after a browser refresh, if you want to persist any values then you would need to leverage browser storage or other form of data storage methods.
React Routing
React Router
Traditional multi-page web application uses server based routing where the user requests for a page, the request goes to the server, and when they navigate through different parts of the web page it a new request will be sent to the server to request for a new page. The browser will basically request new web page everytime the user interacts with the web page.
That's the traditional MPA model, on the other hand, Single Page Application model uses client side routing that basically loads in only single HTML page. When the user navigates to a different route, React Router will intercept the URL and update the browser history without re-requesting the request to the server. The page is dynamically updated with the corresponding component based on the route. The web application will only request API to the server for data to populate for the web page. This improves user experience because it doesn't need to go to the server for every navigation.
React Router isn't package by default from the core library and in order to leverage it you will need to install it into your React application.
npm install react-router-domHow to Implement Routing
To implement routing you would need couple components to manage the user's navigation history.
BrowserRouter
This component is the backbone of React Router, it will keep your UI in sync with the URL. So whenever you make changes to the URL it will result in the correct corresponding component being rendered. This means that any navigation will result also in browser history allowing the user to easily go back or go forward in their page history.
Under the hood, this component uses the HTML 5 History API which consists of pushState, replaceState, popState to monitor and manipulate the application's browsing history.
To leverage this component you would wrap your entire application in BrowserRouter component in order to give React Router the control of your application and enable routing correctly.
app.render(
    <BrowserRouter>
        <Content />
    </BrowserRouter>
);
In this simple example, we have wrapped our main web application with BrowserRouter enabling the routing capability for our application.
Routes and Route
These two components are used to group all of the app's routes. Each Route is used to specify a path to the React component that you would like to render when the URL matches to the given path.
As a example you can define routing to your web application like such:
app.render(
    <BrowserRouter>
        <Routes>
            <Route path="/" element={<MainPage />} />
            <Route path="/about-me" element={<SidePage />}/>
        </Routes>
    </BrowserRouter>
);
The Route components contains the / URL path that the MainPage component will be rendered and /about-me for the SidePage.
As you can see, the component that you're rendering will need to be put into brackets and referenced within it, otherwise, JSX will not know that it is a React component that you would like to render.
Link
app.render(
    <BrowserRouter>
        <nav>
            <Link to="/">Main Page</Link>
            <Link to="/about-me">About Me</Link>
        </nav>
        <Routes>
            <Route path="/" element={<MainPage />} />
            <Route path="/about-me" element={<SidePage />} />
        </Routes>
    </BrowserRouter>
);useNavigate
You can also programmatically navigate the page, say after you click a button inside the component or after handling an event.
export default function MainPage() {
    let navigate = useNavigate();

    function handleSubmit() {
        navigate("/about-me")
    }

    return (
        <div>
            <button onClick={handleSubmit}>Click me</button>
            <p>This is a page about me personally!</p>
        </div>
    )
}
React Hooks
useState
The fundamental of storing information. useState hook allow you to create local state returning you both the value that you can access as well as a setter to modify the value. The modification of the state will trigger a re-rendering of the component.
A simple example of using state would be just a counter with a button that you can click an increment on.
function Counter() {
  const [count, setCount] = useState(0);

  return (
    <div>
      <p>You clicked {count} times</p>
      <button onClick={() => setCount(count + 1)}>Click me</button>
    </div>
  );
}
useEffect
useEffect replaces the old lifecycle method in react like componentDidMount, componentDidUpdate, componentWillunmount. You can provide a callback method to run whenever the condition triggers. The condition is specify through the second parameter which is called the dependency array.
[]-> Whenever the component is mounted (The component has been loaded into the DOM)no array-> Run after every single render[state]-> Monitor a state so that whenever the state changes the method will be invoked
This is just a more extensive example of on how to use useEffect to trigger the update to displayString to append an extra pipe character whenever you increment by pressing the button. As you can see the button is not directly affecting the displayString but rather through the side effects of the hook.
function Counter() {

    let [counter, setCounter] = useState(0);
    let [displayString, setDisplayString] = useState("|")

    function increment() {
        setCounter(counter + 1);
    }

    useEffect(() => {
        setDisplayString(displayString + "|")
    }, [counter])

    return (
        <>
            <p>{displayString}</p>
            <button onClick={increment}>Increment</button>
        </>
    )
}

export default function SidePage() {
    return (
        <div>
            <Counter />
        </div>
    )
}
One subtle thing if you have clean up functions is that:
  useEffect( () => {
      console.log('Effect is applied')
      //some logic
      return () => {
          console.log('cleaning up')
          //cleanup logic
      }
  })
  return (<>
      {console.log('rendering...')}
   </>)
Say you have a component that does the following, if the passed prop is changed then the component will be re-rendered. You might think the order goes like this:
- 'cleaning up'
- New prop is passed
- 'rendering'
- 'Effect is applied'
In reality that is not the case, in reality the ordering goes like this:
- New prop is passed
- 'rendering'
- 'cleaning up'
- 'Effect is applied'
That is clean up function is ran AFTER the new rendering of the updated props but BEFORE the new effect is applied.
https://stackoverflow.com/a/58099371 done for performance reason.
useContext
useContext solve one of the common problem that you might encounter when using React which is passing states around from the parent to deeply nested children.
Say the state is held by the highest parent and you would need to pass the state to one of the deeply nested children in order for it to display the value properly.
In React the manner of passing props deeply down to one of the child component is called props drilling.
You can see from this example that the Parent had to pass the value as prop through ChildA and then from ChildA to ChildB in order to display the value. Wouldn't it be easier if ChildB was able to just access the value directly from the Parent? With useContext hook you can!
function Parent() {
    let [value, setValue] = useState("Display from me nested Child B");

    return (
        <ChildA display={value} />
    )
}

function ChildA({display}) {
    return (
        <>
            <p>Child A</p>
            <ChildB display={display} />
        </>
    )
}

function ChildB({display}) {
    return (
        <p>{display}</p>
    )
}

export default function SidePage() {
    return (
        <div>
            <Parent />
        </div>
    )
}
In order to leverage useContext you must first create the context through the createContext and then wrap your child component that would like to have access to those states through the context provider.
const ParentContext = createContext();

function Parent() {
    let [display, setDisplay] = useState("Display from me nested Child B");

    return (
        <ParentContext value={display}>
            <ChildA />
        </ParentContext>
    )
}

function ChildA() {
    return (
        <>
            <p>Child A</p>
            <ChildB />
        </>
    )
}

function ChildB() {
    let display = useContext(ParentContext);

    return (
        <p>{display}</p>
    )
}

export default function SidePage() {
    return (
        <div>
            <ReferenceTest />
        </div>
    )
}
With the ParentContext.Provider you set the value that you would like to set within context through the value attribute. In this case we are sharing the display state. Now once you wrap the component that you would like to have access to state, all of the children would be able to have access to the context by calling useContext hook.
As you can see within ChildB component we don't need the prop anymore, we can just access it through the context block.
Context can also be nested, if a component is nested in nested context then it will be using the closest context provider for resolving the value.
useRef
useRef is the last of the four most common hook that you will be encountering in React. It is very similar to useState in that they both create a mutable variable that you can use within your component. When you create a reference you can access the value through the current value.
The difference between a state and reference is that, everytime a state is updated through the setter method it will trigger a re-rendering of the component, however, with a reference when you make modification to the current value, it will not trigger a re-render of the component.
An example of creating a reference would be:
function ReferenceTest() {
    let counter = useRef(0);

    function handleIncrement() {
        counter.current++;
        console.log(counter.current);
    }

    return (
        <div>
            <p>{counter.current}</p>
            <button onClick={handleIncrement}>Click me</button>
        </div>
    )
}

export default function SidePage() {
    return (
        <div>
            <ReferenceTest />
        </div>
    )
}
You can see in this example, if you were to click on the button, the counter.current value displayed in the HTML page will not be incremented, but if you observe in the console output you will see that the value is indeed being incremented. This is because changing a reference will not trigger a re-rendering of the component.
Practical Usage
One of the common usage of useRef is to point to the real DOM element that's within the HTML and using that as reference you can call DOM methods on it such as focus or select, to focus user's input field to those elements.
function ReferenceTest() {
    let nodeReference = useRef(null);

    useEffect(() => {
        nodeReference.current.focus()
    }, [])

    return (
        <div>
            <input ref={nodeReference} defaultValue="Focus on me" />
        </div>
    )
}
This example component when render will focus the user's texting cursor to the input field when it is loaded. nodeReference.current in this case is pointing to the actual DOM <input> element that's within HTML and therefore that's why you're able to use .focus on it.
The usage of reference comes around when you want to have a mutable variable to store something but you don't want the DOM to react to it. Like an ID or something. Reference also survives re-render as oppose to variables declare with let which is reset to whatever the default value is after re-render.
useMachine / createMachine
Note this hook comes from the xstate library and is not part of the standard React library. If you want to use machine you would need to pull this library in first.
In a standard React app you would use states within your application, but as your application get complex, you end up with bunch of state isLoading, isError, isSuccess, isWorking. They could all be say true by accident because of poorly managed states. The XState library's State Machine aims to help avoid those issues.
Quick recap, XState's definition of machine (or state machine) is a model that basically can only be in one status (mode) at any given time. It can be transitioned to other mode by moving the state machine to another state.
In order to leverage XState's State Machine you would have to first define the specs of the machine which can be done like below:
import { createMachine, assign } from 'xstate';

export const toggleMachine = createMachine({
  id: 'toggle',
  initial: 'inactive',
  context: { count: 0 },
  states: {
    inactive: {
      on: { TOGGLE: { target: 'active', actions: assign({ count: ({ context }) => context.count + 1 }) } }
    },
    active: {
      on: { TOGGLE: { target: 'inactive' } }
    }
  }
});
There are couple interesting things.
id: This is just a unique string to identify the machine. This will become helpful when you have multiple machines runningcontext: This is where you will be storing any relevant information that you would want along with the different states. You don't necessary need to use context, it is just any information that you would to attach to the machine as it transition to different states. Method of access will be discussed later. Data inside here are reactive meaning React will re-render the component used any of the value and the value changesinitial: The initial starting point of the machinestates: This is heart of the object. It has information about the states that this machine can be under, as well as what actions to take as it assumes a specific state. For example, in the above code snippet. There are only two states available to the machineinactive / active. Theonproperty describes the action that the machine will take as it becomes that particular state. When the state is inactive and it receives an event calledTOGGLEthen it will transition itself toactivewhile incrementing thecountstate inside the context object.
Using the Machine
Now that you have created the machine specs and you would like to use it below is an example of how:
import { useMachine } from '@xstate/react';
import { toggleMachine } from './toggleMachine';

function ToggleButton() {
  // useMachine creates + starts an actor for you automatically
  const [state, send, actor] = useMachine(toggleMachine);

  return (
    <button onClick={() => send({ type: 'TOGGLE' })}>
      {state.value === 'inactive' ? 'Turn on' : 'Turn off'}
    </button>
  );
}
Taking the same machine defined above, to leverage the machine you would need to invoke the useMachine hook and provide the machine. The hook returns [state, send, actor].
The first argument is a snapshot of the machine to give you rich information about the current state of the machine. For example:
- You can access the current state of the machine through
state.value state.matches('x')to check the state as it returns a booleanstate.context.<>to check the context data that's stored within the machine
The second argument is the function that you call in order to transition the state machine into different states.
send({ type: 'TOGGLE' }); // If you only want to send the event without any additional information
send({ type: 'SUBMIT', values: formData }); // Sending along with the a payload which the state machine can access
send('RESET'); // Shorthand if there are no payload needed
The state machine will check if within the current state, does it react to the given event, if it does then it will transition to it along with any other additional actions, if it cannot then it will not transition to the new state.
The third argument isn't often used and is called actor. It represents the running instance of the state machine. You would typically need to interact with this if you want to interact with the lower level APIs.
Overriding Initial Data
If you want to override the defaults of the defined machine specs you can also do so when you're creating the machine:
const [state, send] = useMachine(toggleMachine, {
  // These override machine defaults
  context: { count: 5 },
  actions,
  guards,
  services
});
You may notice that there are actions, guards, services being defined. These are important behavior that you can attach to a state machine to decide when something happens, what happens, and how long complex asynchronous things take respectively.
When you define it through the override object, they will be available to use as a string name when you define the states property.
Guards
This is the if-statement checks that decides whether or not the transition to the state is permitted or not.
Writing guards requires a pure function that returns true or false, without any side effects. If it returns false, then the state transition is skipped.
The method signature for each of the guard is below:
({ context, event }) => booleanSo for example:
createMachine(machine, {
  guards: {
    isAdult: ({context}) => context.age >= 18
  }
});
To use it within the states step you would just refer to it with the guard property:
{
  id: 'checkout',
  initial: 'cart',
  states: {
    cart: {
      on: {
        CHECKOUT: [
          { target: 'payment', guard: 'isAdult' }
        ]
      }
    }
  }
}
Actions
This runs a specific code when a transition happens. You're able to mutate the state within this handler and has the method signature:
({context, event, self }) => voidYou can also just use the assign for context updates. Actions are ran after the transition has happened. You're also able to run an array of actions.
Services
Services handle asynchronous work, meaning you're able to use the async / await keyword, dealing with promises, callbacks will be done with services.
The machine will wait for the asynchronous work to complete and receives completion events.
React Reducer
Reducer
In an React application you might have a lot of state that you're maintaining across multiple event handler and it can get overwhelming. You can consolidate those state update logic outside of the component into a single function called a reducer. The reducer will take care of the corresponding state updating for you, and within your application you just need to invoke it.
In order to really understand Reducer we will need an example application, and in this case we will be exploring a sample todo list to observe the benefit of how utilizing reducer help with consolidating with the management of states.
The todo list app can be sample here here. Read through the codebase and understand how the flow of this simple todo list goes:
- TaskApp: This is the main component that starts up the chain. This is where the task data is initialized as state as well as keeping track of the id of the task. They are just hard-coded as global variable data which persist after re-rendering. In real-world example these would probably come from a context that's initialized through a database call
- AddTask: Add task is the first component first TaskApp, it takes in the function that adds on a new task to the state that's within TaskApp. When the user finishes entering the detail of the new task that they would like to add, it calls the event handler of handleAddTask which will add a new task, incrementing the id counter and pull in the text detail that was entered in AddTask
- TaskList: This is the other component that's within TaskApp it takes in the list of task object, the handler for both updating the task and deleting the task as properties. It renders out each of the tasks object as Task component and pass in the handlers to each of the Task component
- Task: This is the main component which both displays, edit, and deletes the task from the task state. It declares a state that dictates whether or not text of the task is being edited right now, each update to the input calls the handleChangeTask handler which just updates the task to the current one that's being edited right now, notice that the change event handler still calls setTasks this is how the state are being kept in sync, if you were to display the task out in the webpage it will be updated as you edit the task. Then for delete it just calls the handleDeleteTask which just simply update the task to be lists that's not the deleted ones quite clever!
As you can see there are a lot of event handler passing and calling which is hard to keep track of in a larger application. This is where reducer comes into play. Reducer let's you aggregate all those event handler functions into one place, and the component that needs to make updates to the state will just access those updates directly without having to rely on the parent component passing them the event handler.
Using Reducer
Going off from the previous example if we want to incorporate in reducer there are couple of things that we need to do.
1. We move the state setting to dispatching actions
Let's just extract out all of the functions that handle the updates to the task state. It would just be these three functions.
function handleAddTask(text) {
  setTasks([
    ...tasks,
    {
      id: nextId++,
      text: text,
      done: false,
    },
  ]);
}

function handleChangeTask(task) {
  setTasks(
    tasks.map((t) => {
      if (t.id === task.id) {
        return task;
      } else {
        return t;
      }
    })
  );
}

function handleDeleteTask(taskId) {
  setTasks(tasks.filter((t) => t.id !== taskId));
}
If we want to move managing states manually to using reducers, we will need to switch the paradigm to dispatching "actions".
function handleAddTask(text) {
  dispatch({
    type: 'added',
    id: nextId++,
    text: text,
  });
}

function handleChangeTask(task) {
  dispatch({
    type: 'changed',
    task: task,
  });
}

function handleDeleteTask(taskId) {
  dispatch({
    type: 'deleted',
    id: taskId,
  });
}
We update the functions to use the dispatch function to handle the state updates. Don't worry the dispatch function will be defined a bit later. The thing that you pass into the dispatch function is called an action. It is just a regular JavaScript object that contains what what you want to put in. At it's minimum it should contain information about what happened (what actions did the user took?) This is indicate through the "type" field by convention, along with any other information that's necessary to make the update to your state.
2. Writing the reducer function
A reducer function will take in the state and the action as the parameter. It will update the state variable which is tasks in this case based off the action that was taken by the user, remember dispatch?
This is essentially the logic that was in each of the handler function for handling the state management, and you can see it is now converged into this reducer function.
function tasksReducer(tasks, action) {
  if (action.type === 'added') {
    return [
      ...tasks,
      {
        id: action.id,
        text: action.text,
        done: false,
      },
    ];
  } else if (action.type === 'changed') {
    return tasks.map((t) => {
      if (t.id === action.task.id) {
        return action.task;
      } else {
        return t;
      }
    });
  } else if (action.type === 'deleted') {
    return tasks.filter((t) => t.id !== action.id);
  } else {
    throw Error('Unknown action: ' + action.type);
  }
}
The reducer function returns what the "next state" would be after the user has taken the "action". This is where the name of reducer function comes from, comes from the reducer function in many programming languages, the values are processed and carried on to the next value to be processed and it boils down to one value at the end.
3. Using the reducer function in your component
Finally, to use the reducer you would want to switch up how you initialize your state, rather than going through useState you would want to go through useReducer.
const [tasks, dispatch] = useReducer(tasksReducer, initialTasks);Just like useState , useReducer returns two values that you can unpack, the first would be the tasks state value that you can pass around and extract information and display in the HTML just like a normal state. The second value would be the dispatcher function that you have written. You would be just be calling the dispatch function in the place that you would want to make update to the state and passing in the action values.
dispatch({type: 'added', id: 5, text: "hello world"})This would invoke the reducer function with the added if statement block.
Notice that the action parameter is the object that comes from what you passed in from dispatch. The first parameter tasks is provided to you automatically by React. dispatch only has to worry about the action parameter and not the state value.
Now rerunning the React application it should function the exact same way without any change in functionality. The benefit is obviously easier to manage the logic for updating the state because all of the logic is within the reducer function.
Global Variables
Global Variables
Global variables in React persist even after re-render. Only the local variable that's instantiated within the React component will not survive the re-rendering, meaning that if the component is updated, those local variable's value will be reset to whatever their default value will be.
let counter = 0;

export default function MainPage() {

    let [state, setState] = useState(0);
    let localVariable = 0;

    function increment() {
        counter++;
        localVariable++;
        console.log(counter);
    }

    function incrementState() {
        localVariable++;
        setState(state + 1);
    }

    return (
        <>
            <p>The global variable is {counter}</p>
            <p>The local variable is {localVariable}</p>
            <p>The state variable is {state}</p>
            <button onClick={increment}>Increment a global variable</button>
            <button onClick={incrementState}>Increment a state variable</button>
        </>
    )
}
No matter where you try to increment the localVariable it will always be reset back to the initial value that it was assigned which is 0.
React Parent and Child Component
Parent Component Updates
When a Parent Component's state or prop is updated and thus re-rendered, the child component that's part of the parent will also be re-rendered, or obviously when the child's state / props also changes.
https://whereisthemouse.com/react-components-when-do-children-re-render
However, sometimes this is not necessary because parent changing doesn't necessarily mean child should also re-render. This is why this optimization of lifting the content up would help:
https://overreacted.io/before-you-memo/#solution-2-lift-content-up
You extract the child component into the child prop and make the parent render that, now because the child has become a prop, if the child doesn't change, then that mean the child won't be re-rendered. Saving optimization there.
This is referred to as lifting the content up
Preserving and Resetting State
https://react.dev/learn/preserving-and-resetting-state
Super useful in understanding how React decides on how it renders the component and when to preserve the states.
memo, useMemo, useCallback
memo
As you know by now, if a parent component renders child component, and if any of the parent component's state or prop changes, it will trigger a re-rendering including all of the recursive child.
function Child() {
    console.log("Child component being rendered");

    return (
        <h1>This is the child component</h1>
    )
}

function Parent() {
    const [counter, setCounter] = useState(0);

    console.log("Parent component being rendered");

    return (
        <div>
            <p>This is the parent component {counter}</p>
            <button onClick={() => setCounter(counter + 1)}>Increments</button>
            <Child />
        </div>
    )
}


export default function App() {
    return (
        <Parent />
    )
}
That is given the above code snippet, if you click on the button to increment, it will trigger the following print out in the console:
Parent component being rendered
Child component being rendered
This should tell you that even though the counter state is not being used in the Child component, it still triggered a rendering because of the fact stated above.
Now what if you have a really expensive Child, and you don't want it to trigger a re-rendering if it isn't necessary? You can leverage memo which allow you to skip re-rendering of a component when it's props are unchanged. In this case we would like to memorize the Child and skip the re-rendering in the case that the parent component's state changes.
Alternatively, and always preferred you should consider lifting your content up that is pointed out here React Parent and Child Component, which also accomplish the same thing, avoiding the re-rendering of the Child component in the case that the state of the Parent component changes.
How to use Memo
To use memo you just need to pass the Component that you wish to memorize into the call, it will return you the memorized version of your component and will usually not be re-rendered when its parent component is re-rendering.
Do note that, React doesn't guarantee that the re-rendering will 100% not happen, it is a performance optimization not a guarantee.
In our example, if we want to skip the re-rendering we would just wrap our Child component in the call and then use it the same way as before.
function Child() {
    console.log("Child component being rendered");

    return (
        <h1>This is the child component</h1>
    )
}

const MemorizedChild = memo(Child);

function Parent() {
    const [counter, setCounter] = useState(0);

    console.log("Parent component being rendered");

    return (
        <div>
            <p>This is the parent component {counter}</p>
            <button onClick={() => setCounter(counter + 1)}>Increments</button>
            <MemorizedChild />
        </div>
    )
}


export default function App() {
    return (
        <Parent />
    )
}
Now if you click on increment, only the Parent component will re-render the Child component will not because there are no prop changes that will result in the Child needing to be updated.
Second parameter
memo(Component, arePropsEqual)
If you take a look at memo you will see that there is a second parameter that you can provide for the memorization call.
The second parameter is a function that accepts two arguments, the component's previous props, and its new props. It should return true if the old and new props are equal: Which means the component will not be re-rendered, otherwise, it should return false, indicating that the function should be re-rendered.
This second argument gives you more control on exactly when to expire the old component and re-render the memorized component.
useMemo / useCallback
Going to be grouping these two together because they are really similar, useCallback is actually a syntactic sugar for useMemo.
By definition:
useMemo: Caches the result of a calculation between re-rendersuseCallback: Caches a function definition between re-renders
They have similar function signature being:
const cached = useMemo(calculateValue, dependencies)
const cached = useCallback(fn, dependencies)- calculateValue: Being the function that computes the final value that you're aching. It takes in no argument and should return a value of any type. On the first render, React will call this function to retrieve the initial value, on next render, React will check if any of the dependencies have changed since the last render, if it hasn't it will return the same value, otherwise, it will call the function again and give you the new value and caching it
- fn: Similar idea, instead of value, it will be the function that you would want to cache. This function can take in any number of arguments and return any value. React during the first render will return this function back to you, then on the next render, React will check if any of the dependencies have changed since the last render, if it hasn't it will return you the same function, otherwise, it will return you the updated function.
With newer React compiler, the optimization is actually done for you automatically hence you don't need to call these yourself anymore
Using useMemo and useCallback
With useMemo a great use case of this is to cache an expensive operation. Say you need to sort through a list and that list is huge but it doesn't change often, you would 100% want to leverage useMemo to cache the result of the sort to avoid re-calculating the same value when the component is re-rendered, otherwise your application might not be responsive to the user.
function sort(array) {
  // expensive sorting
}

const cached = useMemo(() => sort(input), [input]);
With useCallback, like it was mentioned, it is just a syntactic sugar on useMemo, useMemo(() => helloWorld, []) is functionallity
function helloWorld() {
}

useMemo(() => helloWorld, []); // Returns you a function as value that you would want to cache
useCallback(helloWorld, []); // Takes in the function as value that you want to cache, they are equivalent
useCallback is especially useful for skipping re-rendering of components.
Say we again have the same Parent and Child component relationship again.
function ProductPage({ productId, referrer, theme }) {
  // Every time the theme changes, this will be a different function...
  function handleSubmit(orderDetails) {
    post('/product/' + productId + '/buy', {
      referrer,
      orderDetails,
    });
  }

  return (
    <div className={theme}>
      {/* ... so ShippingForm's props will never be the same, and it will re-render every time */}
      <ShippingForm onSubmit={handleSubmit} />
    </div>
  );
}
Don't worry about the actual working of the Component, focus on the handleSubmit function. Now in Javascript, whenever you run function() {} or () => {} this always triggers a new reference being created, that means, whenever ProductPage is being rendered (when any of its prop or state changes), handleSubmit will be re-created with a new definition.
And that means ShippingForm will be re-rendered as well because the prop changed. Now this is where useCallback comes in handy, because it caches the function result for you allowing ShippingForm to skip re-rendering if you combine it with the memo technique that was discussed.
If you only use memo it will not work because like was mentioned, function() {} or () => {} triggers a new function definition every time it is encountered. So if you want to skip re-rendering of the Child then you will want to do both, useCallback to cache the function, then use memo to skip re-rendering of the Child component because the prop didn't change.
import { memo, useCallback, useState } from "react";


function Child({onSubmit}) {
    console.log("Child component being rendered");

    return (
        <div>
            <h1>This is the child component</h1>
            {onSubmit()}
        </div>
    )
}

const MemorizedChild = memo(Child);


function Parent({theme}) {
    const [counter, setCounter] = useState(0);

    console.log("Parent component being rendered");

    const cached = useCallback(() => {
        return (
            <h1>Hello world {counter}</h1>
        )
    }, [counter])

    return (
        <div>
            <p>This is the parent component {counter}</p>
            <button onClick={() => setCounter(counter + 1)}>Increments</button>
            <MemorizedChild onSubmit={cached} />
        </div>
    )
}


export default function App() {
    const [theme, setTheme] = useState("dark");

    return (
        <div>
            <Parent theme={theme}/>
            <button onClick={() => setTheme(theme === "dark" ? "light" : "dark")}>Toggle Theme</button>
        </div>
    )
}