| Length | Signed | Unsigned |
| 8-bit | `i8` | `u8` |
| 16-bit | `i16` | `u16` |
| 32bit | `i32` | `u32` |
| 64-bit | `i64` | `u64` |
| 128-bit | `i128` | `u126` |
| arch | `isize` | `usize` |
References uses the ampersand syntax, note this is not getting back the pointer, although, references are implemented via pointer, this is different than saying &num in C, which get you the pointer that points to the number.
```rust fn main() { let s1 = String::from("hello"); let len = calculate(&s1); println("{}'s length is {}", s1, len); } fn calculate(s: &String) -> usize { s.len() } ``` In this case, in order to pass a reference of a variable, we have to change the parameter type of the function from `String` to `&String` to denote that the parameter is indeed a reference to a String. This is called borrowing, it is borrowing the reference without moving it. Now `s` will be a reference, which points to the same data that `s1` points to. ##### Mutable references If you want to say append any data to the reference that is passed to a function, you have to add the mutable modifier otherwise, the reference would not be able to make any changes to the data on the heap. ```rust fn main() { let s = String::from("hello"); change(&s); } fn change(some_string: &String) { some_string.push_str(", world"); // This will not work! } ``` After adding `mut` modifier to both of the variable and the function header to signal that this function will change the String then it will work properly: ```rust fn main() { let mut s = String::from("hello"); change(&mut s); } fn change(some_string: &mut String) { some_string.push_str(", world"); } ``` When you are doing mutable borrowing you can only do so when there is no other references to that same value: ```rust let mut s = String::from("hello"); let r1 = &mut s; let r2 = &mut s; // second mutable borrow occurred, doesn't work ``` In this case `r2` is a second mutable borrower, but there is already a mutable borrower that existed already, hence the code will not compile. **In addition, if you are creating mutable references you cannot fix it with immutable references:** ```rust let mut s = String::from("hello"); let r1 = &s; // no problem let r2 = &s; // a second immutable reference is fine let r3 = &mut s; // error mixing immutable and mutable references ``` However, if you finish using a reference, (the scope of a reference starts from where it was introduced and continue through the last time that reference is used), then you can introduce say a mutable reference. ```rust let mut s = String::from("hello"); let r1 = &s; // fine let r2 = &s; // both immutable reference so is okay println!("{} {}", r1, r2); // using the two immutable references, so their scope ends here let r3 = &mut s; // introducing a mutable reference, it is okay because immutable references ended the line before println("{}", r3); ``` ##### Dangling reference If you are creating a local variable in a function, and then you attempt to return a reference to that variable from that function, Rust will prevent you from doing that because the data will be invalidated after the function is finished. To resolve that problem, instead of returning a reference, return that variable directly, this will result in a move which won't deallocate that local variable if it is a move. However, if you return a reference, the local variable will be deallocated and that reference will become invalid. (In C you can return a pointer to a local variable after the function is finished, but dereferencing it will resulting in undefined behavior). # Slice Type ### Slice type Slices in Rust let you reference a contiguous sequence of elements in a collection rather than referencing the whole collection. It is also a reference so there is no ownership, no moving. Let's start with a string slice that reference to a part of a String: ```rust let s = String::from("hello world"); let hello = &s[0..5]; let world = &s[6.11]; ``` To create a slice you specify the collection you are creating the slice reference from along with the `&` to indicate that it is an reference. Then you provide the range `[starting_index..ending_index]`, `starting_index` is the first position in the slice and `ending_index` is the ending element index, excluding that element. ##### Why slice? The reason why we are using slice because say we are finding a particular index in a String, after finding that index number, that String suddenly changed, but you still used the old index number that isn't valid anymore, this will result in a code bug. However, using slice type, your compiler will ensure that the index number or particular information you retrieve about that String remains valid before it is changed. ```rust let mut s = String::from("hello world"); let word = first_word(&s); // get the reference to "hello" in s s.clear(); // error, because we are using mutable reference here, but there is a immutable reference existing! println!("the first word is {}", word); ``` Thus using slice type will prevent any mutable changes from happening before the slice type gets used. ### String literals ```rust let s = "hello world"; ``` The type of `s` here is `&str`, a slice that points to that string literal in binary. It is also immutable because there is no `mut` modifier. ##### Using string slice as parameters By making the parameter of a string from ```rust fn first_word(s: &String) -> &str ``` Into to ```rust fn first_word(s: &str) -> &str ``` We are able to take slices of String whether partial or whole, or on the entire reference, because slice type are reference themselves. We can also slice type string literal, because string literal themselves are also string slices you can also pass them in directly, or you can slice them too. ```rust fn main() { let my_string = String::from("hello world"); // `first_word` works on slices of `String`s, whether partial or whole let word = first_word(&my_string[0..6]); let word = first_word(&my_string[..]); // `first_word` also works on references to `String`s, which are equivalent // to whole slices of `String`s let word = first_word(&my_string); let my_string_literal = "hello world"; // `first_word` works on slices of string literals, whether partial or whole let word = first_word(&my_string_literal[0..6]); let word = first_word(&my_string_literal[..]); // Because string literals *are* string slices already, // this works too, without the slice syntax! let word = first_word(my_string_literal); } ``` # Using Structs to Structure Related Data ### Defining and instantiating structs Struct allows you to compose different type of data together into one big object, just like structs in C. You will have to name each piece of data that you are using so that you can access them when you instantiate a struct later. Here is how to define a sample struct (Note you would write this outside of functions): ```rust struct User { active: bool, username: String, email: String, } ``` Then to instantiate a struct: ```rust fn main() { let user1 = User { active: true, username: String::from("Ricky"), email: String::from("irebo@gmail.com"), }; } ``` To access the fields that you have instantiated you would use the dot notation, `user1.active, user1.username, user1.email`. To make the struct mutable you would also attach the `mut` modifier to the variable. The entire instance of struct must be mutable, Rust doesn't allow partial field mutability. ### Field init shorthand Say you have a function that builds your struct and return it as its return value depending on the parameter you passed: ```rust fn build_user(email: String, username: String) -> User { User { active: true, username: username, email: email, } } ``` Writing it like this will get repetitive, especially if there are going to be lot of parameter, instead you can use a shorthand, just ignore the key if the parameter that you passed into the function is the same as the key name: ```rust fn build_user(email: String, username: String) -> User { User { active: true, username, email, } } ``` This is much more concise without the repetition. ##### Creating instances from other instances with struct update syntax Sometimes you might want to create a new instances from the old instances, changing some of the old values but keep the rest the same. You can do it the hard coded way like such: ```rust fn main() { // created user1 here let user2 = User { active: user1.active, username: user1.username, email: String::from("new email@gmail.com"), }; } ``` This works but you have to type out all of the fields that are repeated, a much shorter way to do this is to use struct update syntax: ```rust fn main() { // create user1 here let user2 = User { email: String::from("new email here"), ..user1 } } ``` With this syntax, you only have to worry about writing the new value for the new instance, and leave all of the old values to struct update syntax to handle. `..user1` must come last to specify that any remaining fields should be getting their values from the corresponding fields in `user1`.struct update syntax uses `=` like an assignment, so it will be moving data. After doing struct update you can no longer use `user1` as a whole after creating `user2` since data like `username` is moved to `user2` and not copied!
##### Tuple struct You can also create a tuple struct, which is like struct but doesn't have names associated with their fields, they only have type of the fields. This is useful if you just want to give a simple tuple a name. And separate different type of tuple from each other. ```rust struct Color(i32, i32, i32); struct Point(i32, i32, i32); fn main() { let black = Color(0, 0, 0); let origin = Point(0, 0, 0); } ``` You can access the tuple using the same tuple syntax, `tuple.Just for your information, no matter which `self` you do, taking ownership or do borrowing, Rust will automatically add the appropriate `&, &mut, or *` for you automatically. This is so that you can just focus on calling the method on the object without worrying about anything else
```rust p1.ditance(&p2); // vs (&p1).distance(&p2); ``` ##### Associated functions Functions implemented with `impl` block are called assocaited functions because they are connected to the type of struct they are defined. You are able to define associated functions that don't have `self` as first parameter (hence they are no longer methods) they are reference to as static or class methods. They are associated with the type rather than an instance. Associated functions that don't have `self` are often used for constructors that return new instance of the struct, just like `String::from`. ```rust impl Rectangle { fn square(size: u32) -> Self { Self { width: size, height: size, } } } ````Self` in this case is an alias for the type that appears after the `impl` keyword, `Rectangle` in this case.
Then to call associated functions that doesn't take `self` as first parameter you use the `::` syntax with the struct name like such: ```rust let sq = Rectangle::square(3); ``` ##### Multiple impl block You can separate different methods into `impl` blocks, although there is really no reason to unless for readability. ```rust impl Rectangle { fn area(&self) -> u32 { self.width * self.height } } impl Rectangle { fn can_hold(&self, other: &Rectangle) -> bool { self.width > other.width && self.height > other.height } } ``` This is perfectly valid syntax. # Enum and Pattern Matching ### Defining an Enum Enum or enumeration gives you a way of defining a set of possible values for one value. "This value can be these possible set of values". To define an enum to be a set of possible values here is an example: ```rust enum IpAddrKind { V4, V6, } ``` Here, the enum `IpAddrKind` is a custom data type that can have two possible values, V4 and V6. After defining this enum you can use it elsewhere in your code. To define an enum with one of its variations you would use the `::` syntax under the enum name like such: ```rust let four = IpAdddrKind::V4; let six = IpAddrKind::V6; ``` ##### Function taking enum You can also then use enum as a function parameter: ```rust fn route(ip_kind: IpAddrKind) {} // invoking it route(IpAddrKind::V4); route(IpAddrKind::V6); ``` ##### Advantage of enum over struct Using enum you can actually give an associated data with each possible variations. You can give say `V4` three `u32` and for `V6` a String value like such: ```rust enum IpAddr { V4(u32, u32, u32), V6(String), } ``` Doing it this way, you do not need to make extra struct to associate data with each of the enum variations. The associated data for each enum variant can be anything: strings, numeric types, or even structs! To actually give the value when creating it you would do something like so: ```rust enum IpAddr { V4(u8, u8, u8, u8), V6(String), } let home = IpAddr::V4(127, 0, 0, 1); let loopback = IpAddr::V6(String::from("::1")); ``` ##### Enum examples ```rust enum Message { Quit, Move {x: i32, y: i32}, Write(String), ChangeColor(i32, i32, i32), } ``` In this case there are four variants of the Message enum 1. Quit: Has no associated data 2. Move: has named fields just like a struct 3. Write: Has a single String 4. ChangeColor: Has three `i32` values ##### Methods on Enum Rememberthat the `impl` block work on structs and also enums. So you can define methods for each enum type that you have defined: ```rust impl Message { fn call(&self) { // method body } } let m = Message::write(String::from("hello")); m.call(); ``` You can call it on the enum variant that you have defined just like how you can call it on an instance of a struct. ### The match control flow construct To actually retrieve the associated value out from the enum variant and do conditional with it you would have to use the `match` construct. You would be able to use the `match` construct to compare a value against a series of patterns then execute code based on which pattern it is matched. `match` not only work with enum types but literal values, variable names, wildcards, and other things as well! ##### Testing match with enum ```rust enum Coin { Penny, Nickle, Dime, Quarter, } fn value_in_cents(coin: Coin) -> u8 { match coin { Coin::Penny => 1, Coin::Nickle => 5, Coin::Dime => 10, Coin::Quarter => 25, } } ``` The function `value_in_cents` will take in an enum of Coin type and then return it's corresponding variant value in `u8`. To use the `match` expression, you would have to use the match keyword follow by the value that you want to pattern match, then you would list out all the possible combination of pattern that you are matching for this particular value. The match arms have two parts, the pattern and some code, if the code is short and one line long, then you don't need another set of brackets, however, if you have multiple lines of code to execute if the pattern matches then you would need the brackets. The pattern and code is separated by the `=>` operator. When `match` expression executes, it compares the value against the pattern of each arm in order, if it matches then that code is executed. ##### Pattern with associated values To retrieve the value for a corresponding enum variant you can follow the same syntax like so: ```rust enum Coin { Penny, Nickel, Dime, Quarter(bool), } ``` In this case, we have a enum variant Quarter with an associated value of `bool` to indicate whether it is rare or not. If we are going to write a function to retrieve that `bool` value from the Quarter variant, how would we do that? ```rust fn retrieve_rare(coin: Coin) -> bool { match coin { Coin::Quarter(rare) => rare, other => false, } } ``` Now if we are calling the function like so `retrieve_rare(Coin::Quarter(true))` this will yield `true` as it's return value. How does it work? Well, we are constructing a Quarter variant of `Coin` enum with `true` as it's associated data to indicate that it is indeed rare. Then when that enum type is passed into the function it will be doing a pattern match, it matches the first pattern because it is a Quarter, the associated data is binded to the variable `rare`, and then we are just simply return `rare` as it is because we just want to get that value out from the enum.Matches must be exhaustive, it must cover all possibilities. If is missing some possibility then the code will not compile!
##### Catch-all pattern If you are only interested in say two out of ten possible patterns and want to handle the rest of the pattern one way, you don't have to code out all of the pattern matches, and instead use a catch-all pattern. ```rust let dice_roll = 9; match dice_roll { 3 => add_fancy_hat(), 7 => remove_fancy_hat(), other => move_player(other), } fn add_fancy_hat() {} fn remove_fancy_hat() {} fn move_player(num_spaces: u8) {} ``` As you can see, the `other` arm at the end will be a catch-all pattern that handles all other patterns that is not 3 and 7. The value of all the none matched pattern are stored into `other`. If we do not need the value, and just need to catch-all then you can use the pattern `_` to do the catch-all. Otherwise, if you don't use the value in catch-all Rust will warn you about unused variable. ### `if let` control flow Combining if and let let you handle values that match one pattern while ignoring the rest. For example: ```rust let config_max = Some(3); match config_max { Some(max) => println!("The max is {}", max), _ => (), } ``` This code will print out the value inside the enum `Some` and for any other variant it will do nothing (i.e. for the `None` variant it will do nothing). However, writing `_` everytime and writing these verbose pattern matching for just doing something small for one pattern is just too repetitive, so `if let` let you condense this into much shorter syntax: ```rust let config_max = Some(3); if let Some(max) = config_max { println!("The max is {}", max); } ``` This is equivalent to the `match` expression done previously but now you don't have to write the `_` catch-all pattern and just focus on the one case you actually care. It works the same way as a `match` expression, it will bind the value inside `Some` to `max` variable if `config_max` is a `Some` enum variant. You can also include an `else` with `if let` syntax. Which is the same as the things inside `_` the catch-all pattern: ```rust let mut count = 0; if let Coin::Quarter(state) = coin { println!("The state is {}", state); } else { count += 1; } ``` This code will increment `count` if the Coin enum isn't an Quarter variant.Generally, use `if let` if you are only expecting to handle one of the enum variant and ignoring the rest.
# Packages, Crates, and Modules ### Crate The smallest unit that the Rust compiler will work with. When you run `rustc some_file.rs` the file `some_file.rs` is treated as a crate file. A crate when being compiled can be compiled into two forms, a binary crate or a library crate. Binary crate are programs that after being compiled are turned into an executable that you can run. Binary crate must have a function called `main` that gets called when the executable is ran. Library crate don't have a `main` function and they do not get compiled into an executable binary. Instead, they defined functions that are meant to be shared with multiple projects, much like exporting some common functions that you are going to be using in other projects. Hence in Rust, when you refer to "crates" it is usually library crate, and refer to binary crate as just the executable or binary. ##### Exporting and importing functionality We will go through how Rust does it's import and export system via an example, assume we have a directory setup as such: ``` my_project ├── Cargo.toml └─┬ src ├── main.rs ├── config.rs ├─┬ routes │ ├── health_route.rs │ └── user_route.rs └─┬ models └── user_model.rs ``` We have functions written in `config.rs, routes/health_route.rs, routes/user_route.rs, and modules/user_module.rs` that we want our `main.rs` use. How do we do that? ##### Importing `config.rs` Rust does not build the module tree for you even though the files with functions that you want your `main.rs` to use is under the same directory, Rust by default only sees the crate module which is `main.rs`. [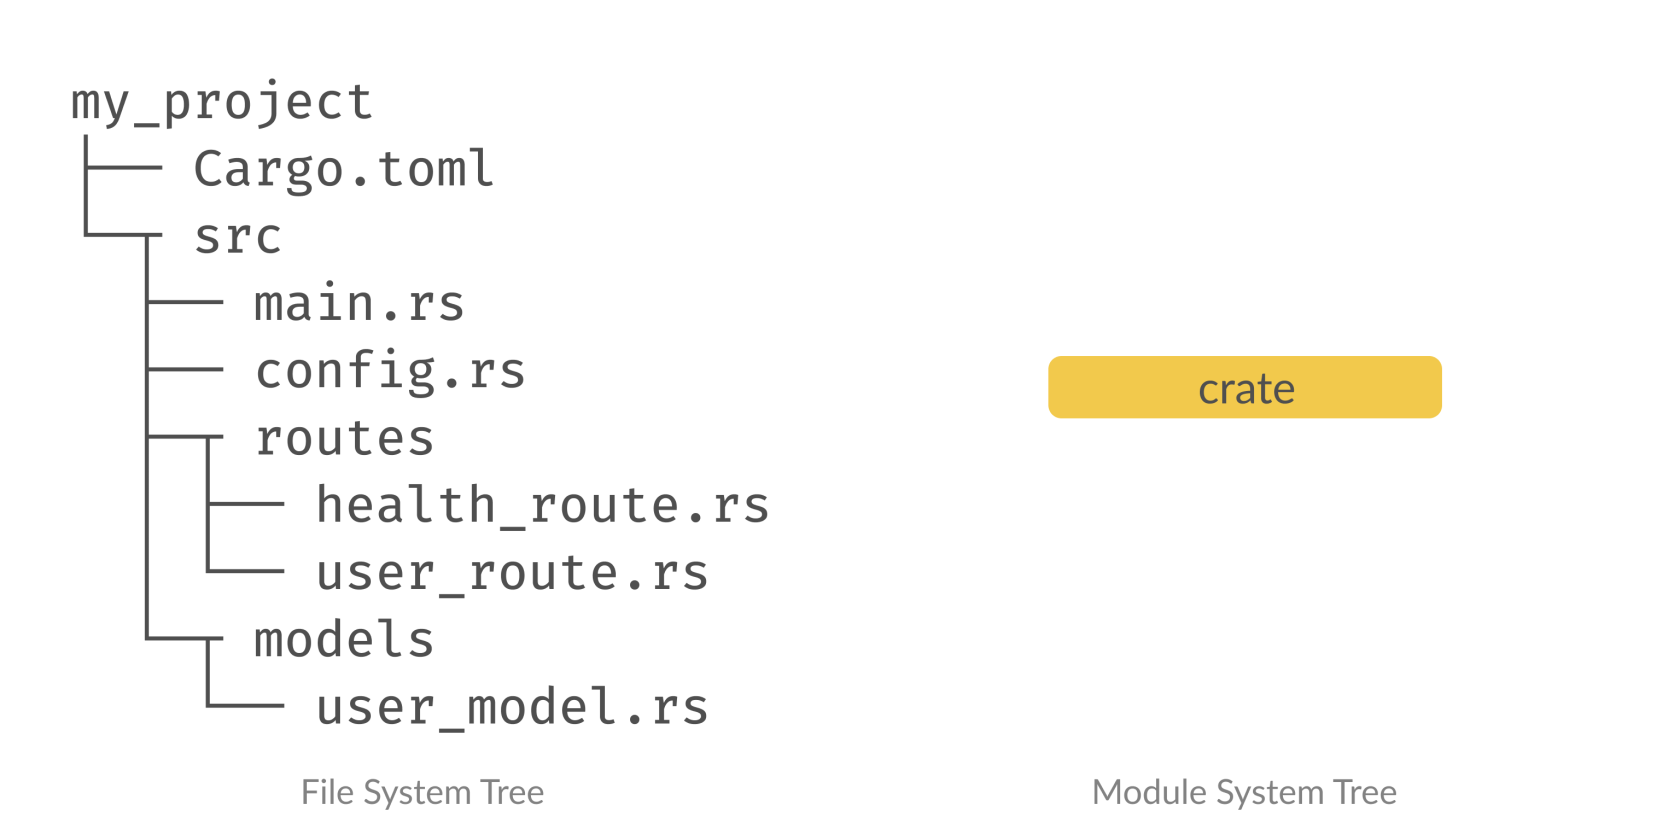](https://wiki.tamarine.me/uploads/images/gallery/2023-01/ZQIimage.png) So what do we do? We will have to explicitly build the module tree in Rust, there is no implicit mapping between the directory tree and the module tree! In order to add files to the module tree we have to declare that file as a submodule using the `mod` keyword. Where do you declare submodule? Where you are using file, in this case we want to call those functions in `main.rs` hence you will have to declare the submodule in `main.rs` by writing `mod my_module;`. By writing `mod my_module` the compiler will look for `my_module.rs` or `my_module/mod.rs` in the same directory. In this case because we are importing `config.rs` which is a file in the same directory as `main.rs` you can just write `mod config;` ```rust // main.rs mod config; fn main() { config::print_config(); println!("main"); } ``` After you import the module the functions can be called by referring to them using `::` under the submodule namespace. After you have declare the submodule the module tree looks something like this: [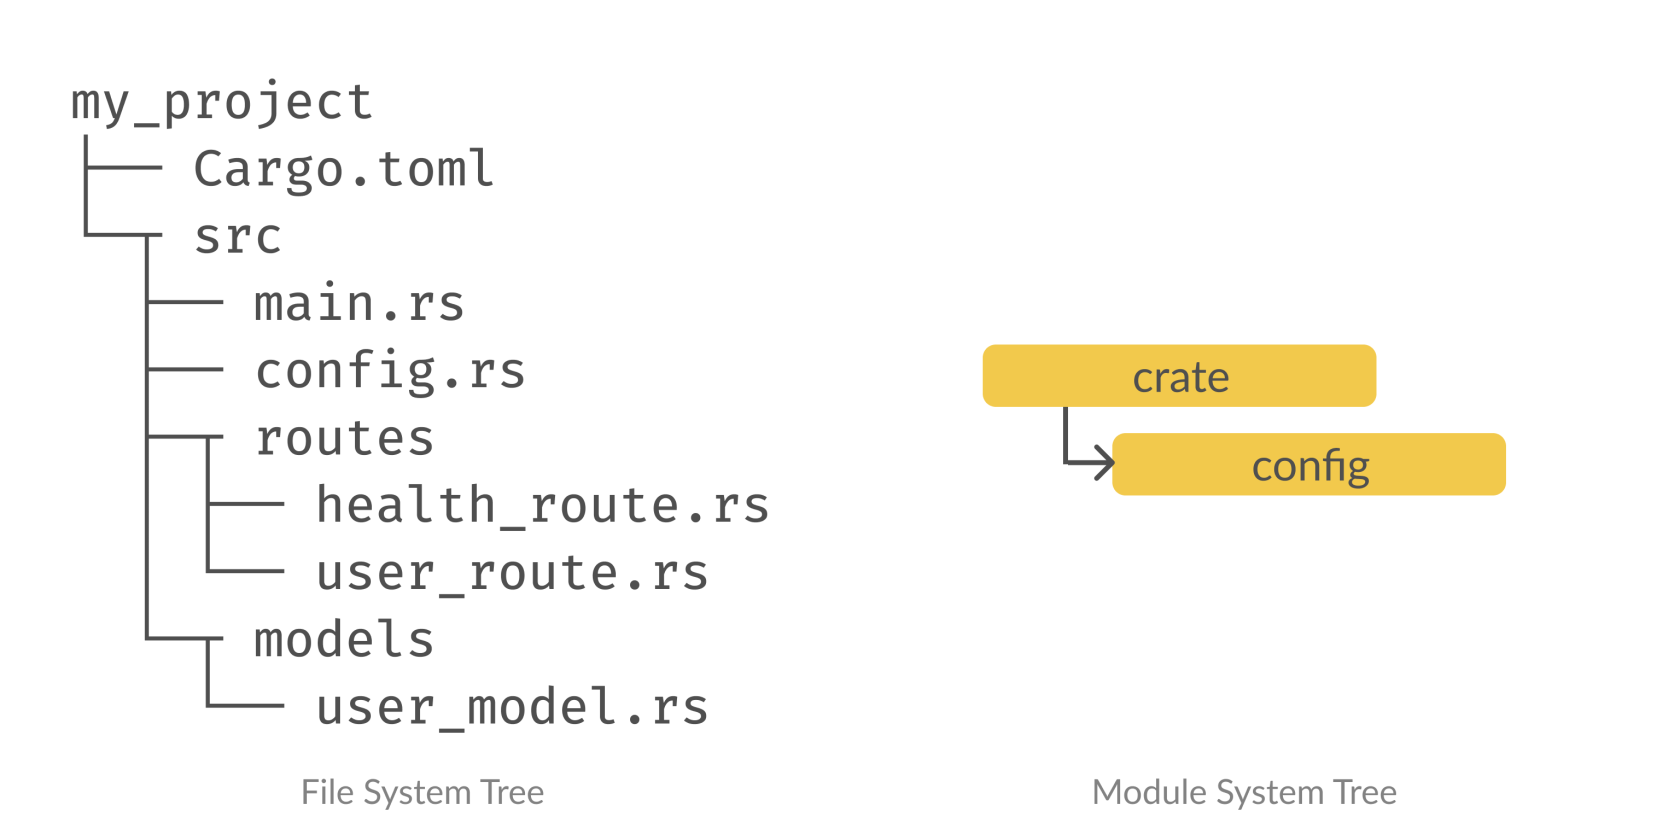](https://wiki.tamarine.me/uploads/images/gallery/2023-01/Axfimage.png) ##### But wait it still doesn't work?! After you have successful declare the `config` module, it isn't enough to call the function because almost everything in Rust is private by default. In order to call `print_config` you have to mark it as a public function that other file can call by using the `pub` keyword. ```rust // config.rs pub fn print_config() { println!("config"); } ``` Now you will be able to run `main.rs` without a problem. ##### Importing `routes/health_route.rs` Now here we are importing another file under another directory the `routes` directory. The `mod` keyword is only for `my_module.rs or my_module/mod.rs` in the same directory. In order to call functions inside `routes/health_route.rs` from `main.rs` here are the things we need to do 1. Make a file named `routes/mod.rs` 2. Declare the `routes` submodule in `main.rs`, this will import the file `routes/mod.rs` 3. Then in `routes/mod.rs` we will declare the submodule `health_route` and make it public by prefixing it with `pub` keyword 4. Then in addition we also have to make the function inside `health_routes.rs` public as well and we are finally done ```c# my_project ├── Cargo.toml └─┬ src ├── main.rs ├── config.rs ├─┬ routes │ ├── mod.rs │ ├── health_route.rs │ └── user_route.rs └─┬ models └── user_model.rs ``` ```rust // main.rs mod config; mod routes; fn main() { routes::health_route::print_health_route(); config::print_config(); println!("main"); } ``` ```rust // routes/mod.rs pub mod health_route; ``` ```rust // routes/health_route.rs pub fn print_health_route() { println!("health_route"); } ```The idea is that if you are going to declare a submodule under another directory, you will import a submodule that has the same directory name. i.e. `another_directory/mod.rs`, and inside that file you will declare the public submodule that you are declaring. Finally make the function of the nested submodule you want to export public as well.
When you call it, you will have to go by the submodule names you have set up including the directory name submodule. # Common Collections ### Vector Allows you to store variable number of values next to each other To create an empty vector you call the `Vec::new` function ```rust let v: Vec